import org.asciidoctor.ast.Document;
import org.asciidoctor.extension.DocinfoProcessor;

import java.util.Map;

public class TabbedCodeBlockDocinfoProcessor extends DocinfoProcessor {
    public static final String TABBED_CODE_CSS_FILE_PATH_ATTRIBUTE = "tabbed-code-css-path";
    public static final String TABBED_CODE_JS_FILE_PATH_ATTRIBUTE = "tabbed-code-js-path";
    public static final String DEFAULT_CSS_FILE_PATH = "/codeBlockSwitch.css";
    public static final String DEFAULT_JS_FILE_PATH = "/codeBlockSwitch.js";

    @Override
    public String process(Document document) {
        if (document.isBasebackend("html")) {
            Map<String, Object> attributes = document.getAttributes();
            String cssPath = getCssPath(attributes, TABBED_CODE_CSS_FILE_PATH_ATTRIBUTE, DEFAULT_CSS_FILE_PATH);
            String jsPath = getCssPath(attributes, TABBED_CODE_JS_FILE_PATH_ATTRIBUTE, DEFAULT_JS_FILE_PATH);
            String css = readFileContentsFromClasspath(cssPath);
            String js = readFileContentsFromClasspath(jsPath);
            return modifyHeadHtml(css, js);
        }

        return null;
    }

    ...
}documentation asciidoc asciidoctor extension testing November 25, 2018
Asciidoc is a powerful markup language and extensible platform for producing documentation. Sometimes the requirements for producing documentation go beyond its built-in capabilities. Asciidoc enabled content producers to enhance the basic functionality of the platform by writing so-called extensions - think plugin for Asciidoc.
AsciidoctorJ is the library for running Asciidoctor on the JVM. It comes into play when converting Asciidoc content to the target format (e.g. HTML) from Java. This library also serves as the basis for writing extensions.
In this blog post, I want to explain how to write, test, publish and use an AsciidoctorJ extension. As an example, we’ll implement functionality for rendering code blocks on multiple tabs. Tabbed code blocks are particularly useful if you want to demonstrate a code example in different languages or tool syntax. Figure 1 shows a tabbed code block in action.
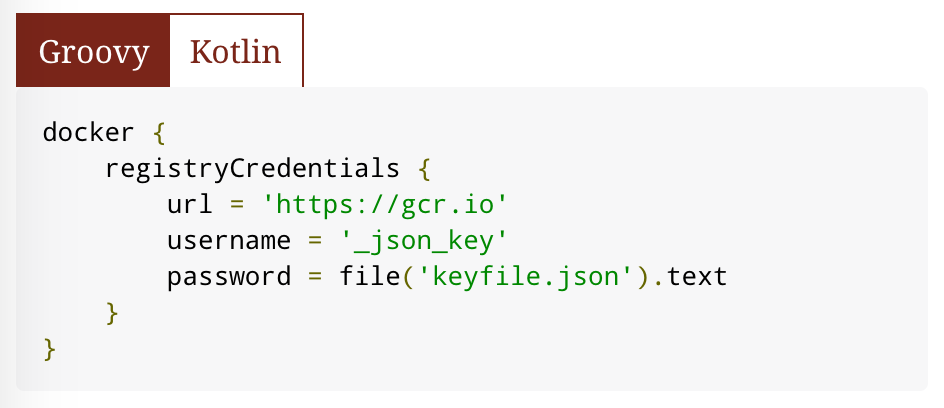
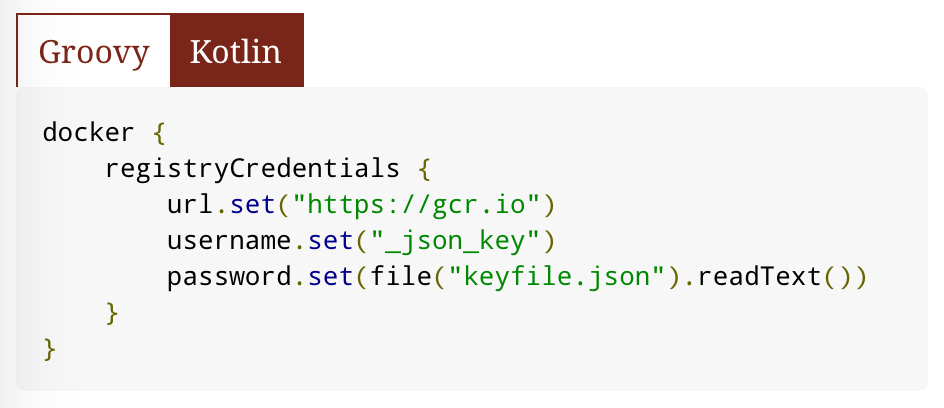
Figure 1. The AsciidoctorJ extension for renderings tabbed code blocks in action
In the figure, you can see the effect of using such an extension in a generated HTML output format. The tabs show a code example for the languages Groovy and Kotlin, each with their own syntax. The user can click one of the tabs to activate the relevant code example. An active tab is highlighted in a specific color.
Let’s dive in and see how to implement this AsciidoctorJ extension. For reference, see the complete source code in on GitHub.
Implementing the extension
The AsciidoctorJ API exposes a set of extension points. An extension point can manipulate the generated result of an Asciidoc document. For example, an implementation of the Postprocessor inserts custom footer text.
A tabbed code block requires the insertion of dynamic behavior and custom styling. For this purpose, we’ll need to add CSS and JavaScript to the <head> tag of a generated HTML document. The DocinfoProcessor extension point can directly manipulate the header and footer of a document and is a good fit for our use case.
Listing 1 shows a class that implements the abstract class DocinfoProcessor. The code example omits elaborate implementation details e.g. how to read a file from the classpath. For more details, have a look at the full source code of the class.
TabbedCodeBlockDocinfoProcessor.java
Listing 1. An implementation of DocinfoProcessor
I’d like to point out two notable pieces in this code example. You might have noticed that the process method only handles HTML processing. We do this for a simple reason. Adding a tabbed code block to other backends like PDF files would require different handling. By default the class uses a predefined CSS and JavaScript file that ships with the distribution of the extension. Alternatively, the end user can also set an attribute for providing custom styling or JavaScript behavior.
Every extension you’d like to make available to the Asciidoctor processor needs to be registered. You do this by implementing a class of type ExtensionRegistry. Listing 2 demonstrates an implementation that adds the TabbedCodeBlockDocinfoProcessor to the extension registry.
TabbedCodeBlockExtension.java
import org.asciidoctor.Asciidoctor;
import org.asciidoctor.extension.JavaExtensionRegistry;
import org.asciidoctor.extension.spi.ExtensionRegistry;

public class TabbedCodeBlockExtension implements ExtensionRegistry {
    @Override
    public void register(Asciidoctor asciidoctor) {
        JavaExtensionRegistry javaExtensionRegistry = asciidoctor.javaExtensionRegistry();
        javaExtensionRegistry.docinfoProcessor(TabbedCodeBlockDocinfoProcessor.class);
    }
}
Listing 2. Registering the DocinfoProcessor with the extension registry
We are not done yet. You also need to create a file named org.asciidoctor.extension.spi.ExtensionRegistry and point it to the extension implementation so that Asciidoctor can discover it.
META-INF/services/org.asciidoctor.extension.spi.ExtensionRegistry
com.bmuschko.asciidoctorj.tabbedcode.TabbedCodeBlockExtensionListing 3. Making the extension discoverable
Voilà, you wrote your first AsciidoctorJ extension. Next, we’ll concentrate on the important aspects of testing, publishing and the usage of the extension.
Testing the extension
Before bundling the extension into a JAR file, we should make sure that the code is tested. Testing an extension is very similar to writing an extension. You can create an instance of Asciidoctor to emulate the processing of an Asciidoc document. To register an extension under test, simply add it to the registry programmatically as with did in TabbedCodeBlockExtension.
It’s worth mentioning that the Asciidoctor instance doesn’t fully behave like the runtime instance you’d usually deal with in a production environment. You’ll have to change the SafeMode and tell the processor which portions of the generated document to produce. In listing 4, we run the the Asciidoc processing in server mode and ensure that we receive the header and footer for later verification in the test case.
TabbedCodeBlockDocinfoProcessorTest.java
import org.asciidoctor.Asciidoctor;
import org.asciidoctor.OptionsBuilder;
import org.asciidoctor.SafeMode;

public class TabbedCodeBlockDocinfoProcessorTest {
    @Test
    @DisplayName("can create HTML tabbed code block with default settings")
    void canCreateHtmlTabbedCodeBlockWithDefaultsSettings() {
        String result = convert(createOptionBuilder());
        verifyConvertedHtml(result, DEFAULT_CSS_FILE_PATH, DEFAULT_JS_FILE_PATH);
    }

    private static String convert(OptionsBuilder optionsBuilder) {
        Asciidoctor asciidoctor = Asciidoctor.Factory.create();
        asciidoctor.javaExtensionRegistry().docinfoProcessor(TabbedCodeBlockDocinfoProcessor.class);
        return asciidoctor.convert(getAsciiDoc(), optionsBuilder);
    }

    private static OptionsBuilder createOptionBuilder() {
        return OptionsBuilder.options().headerFooter(true).safe(SafeMode.SERVER);
    }

    ...
}
Listing 4. Writing tests to verifying the correct extension behavior
The code above only shows one test case. For a full breath of test cases, refer to the full implementation of a JUnit 5 test class.
Next, we’ll look at publishing the extension.
Publishing the extension
To make an extension reusable, you have to compile the source code, bundle it into a JAR file and then publish it to a binary repository. For the example extension, I decided to make it available on Bintray’s JCenter. JCenter is a superset of Maven Central so you should be able to retrieve from there as well.
AsciidoctorJ doesn’t provide any tooling for publishing extensions. I decided to go with Gradle for publishing to Bintray. I won’t go into details in this blog post but you can find the relevant code on GitHub.
Using the extension
Let’s assume we already published a version of the AsciidoctorJ extension. Now it’s time to use it. Optimally, you’d use a build tool to declare a dependency on the binary containing the AsciidoctorJ extension.
Declaring the dependency
A build tool helps you with automatically resolving a dependency and its transitive dependencies. Furthermore, it adds the dependency to the assigned classpath. AsciidoctorJ extensions are not needed during compilation. They only need to be available when processing Asciidoc files - at runtime. Therefore, we’ll have to declare the dependency with the appropriate scope/configuration.
To use the dependency from a Maven build, add the following dependency declaration. The scope should be runtime. Make sure to declare JCenter as one of the repositories in your Maven setup, as shown in listing 5.
pom.xml
<repositories>
    <repository>
      <id>jcenter</id>
      <url>https://jcenter.bintray.com/</url>
    </repository>
</repositories>

<dependency>
    <groupId>com.bmuschko</groupId>
    <artifactId>asciidoctorj-tabbed-code-extension</artifactId>
    <version>0.2</version>
    <scope>runtime</scope>
</dependency>
Listing 5. Declaring the extension dependency in a Maven build
The build code for Gradle looks similar. First, we define JCenter as repository. Then we assign the AsciidoctorJ extension dependency to the runtimeOnly configuration.
build.gradle.kts
repositories {
    jcenter()
}

dependencies {
    runtimeOnly("com.bmuschko:asciidoctorj-tabbed-code-extension:0.2")
}
Listing 6. Declaring the extension dependency in a Gradle build
While talking about the build tool integration, let’s also have a brief look at customizing the extension’s runtime behavior.
Customizing the runtime behavior
You might not like the default look & feel of the rendered tabs. The AsciidoctorJ extension can be configured to use a different CSS and JavaScript files. Attributes are the key mechanism for injecting runtime behavior. In listing 7, we point the attribute tabbed-code-css-path to the custom CSS file available on the classpath of the project.
build.gradle.kts
tasks.named<AsciidoctorTask>("asciidoctor") {
    sourceDir = file("src/docs/asciidoc")
    sources(delegateClosureOf<PatternSet> {
        include("index.adoc")
    })

    attributes(
        mapOf(
            "toc" to "left",
            "source-highlighter" to "prettify",
            "icons" to "font",
            "numbered" to "",
            "idprefix" to "",
            "docinfo1" to "true",
            "sectanchors" to "true",
            "tabbed-code-css-path" to "/customTabbedCode.css"
        )
    )
}
Listing 7. Customizing the AsciidoctorJ extension in a Gradle build
What’s left in this discussion? Using the extension in an actual Asciidoc document. The last section of this blog post gives a quick overview.
Using the extension in an Asciidoc document
Rendering a tabbed code block with the extension in place is a piece of cake. Create different code blocks with the relevant label. Additionally, provide the source code type and a role. Done and done! The resulting tabbed code block should look like figure 1.
sample.adoc
[source,groovy,indent=0,subs="verbatim,attributes",role="primary"]
.Groovy
----
docker {
    registryCredentials {
        url = 'https://gcr.io'
        username = '_json_key'
        password = file('keyfile.json').text
    }
}
----

[source,kotlin,indent=0,subs="verbatim,attributes",role="secondary"]
.Kotlin
----
docker {
    registryCredentials {
        url.set("https://gcr.io")
        username.set("_json_key")
        password.set(file("keyfile.json").readText())
    }
}
----
Listing 8. A tabbed code block for rendering Groovy and Kotlin source code side-by-side
Summary
AsciidoctorJ provides an extension mechanism for enhancing Asciidoctor’s built-in capabilities. In this post, we experienced how to create a customizable tabbed code block by implementing an extension point that modifies the header of a generated HTML document. We learned the essentials about implementing an appropriate extension point and writing tests for it. Later, we briefly touched on the tooling support for bundling and publishing an extension.