pipeline {
    agent any

    triggers {
        pollSCM('*/5 * * * *')
    }

    stages {
        stage('Compile') {
            steps {
                gradlew('clean', 'classes')
            }
        }
        stage('Unit Tests') {
            steps {
                gradlew('test')
            }
            post {
                always {
                    junit '**/build/test-results/test/TEST-*.xml'
                }
            }
        }
        stage('Long-running Verification') {
            environment {
                SONAR_LOGIN = credentials('SONARCLOUD_TOKEN')
            }
            parallel {
                stage('Integration Tests') {
                    steps {
                        gradlew('integrationTest')
                    }
                    post {
                        always {
                            junit '**/build/test-results/integrationTest/TEST-*.xml'
                        }
                    }
                }
                stage('Code Analysis') {
                    steps {
                        gradlew('sonarqube')
                    }
                }
            }
        }
        stage('Assemble') {
            steps {
                gradlew('assemble')
                stash includes: '**/build/libs/*.war', name: 'app'
            }
        }
        stage('Promotion') {
            steps {
                timeout(time: 1, unit:'DAYS') {
                    input 'Deploy to Production?'
                }
            }
        }
        stage('Deploy to Production') {
            environment {
                HEROKU_API_KEY = credentials('HEROKU_API_KEY')
            }
            steps {
                unstash 'app'
                gradlew('deployHeroku')
            }
        }
    }
    post {
        failure {
            mail to: 'benjamin.muschko@gmail.com', subject: 'Build failed', body: 'Please fix!'
        }
    }
}

def gradlew(String... args) {
    sh "./gradlew ${args.join(' ')} -s"
}build continuous delivery jenkins gradle spring heroku October 30, 2017
Introduction
Jenkins World 2017 came to a close in late September. Time to revisit the improvements that have been made to the support for build pipelines. I am no stranger to using Jenkins to model a Continuous Delivery pipeline. In the dark ages, you had to construct a pipeline with the help of different Jenkins plugins bit by bit. The approach was highly brittle, inconsistent and full of magical tips and tricks. You can find a discussion of the approach in my book Gradle in Action.
In this blog post, I am going to discuss how to construct and operate a declarative pipeline with Jenkins. The vehicle for the pipeline is a Java-based web application. To emulate a real-world scenario, every change made to the project travels through the full pipeline and is deployed to Heroku on demand. You can find the full source code on GitHub.
The sample application
The functionality of the sample application is straightforward. It allows the user to record to-do items that can be completed by checking them off the list. A database stores the to-do items and their states. Figure 1 shows a screenshot of the deployed application. You can try out the deployed application for yourself on Heroku.
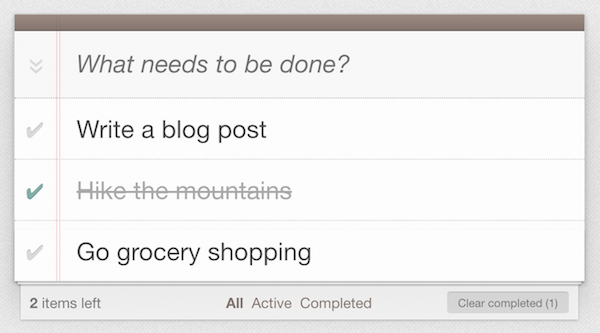
Figure 1. A web-based application for managing to-do items
On the technical side, the web application was built with Java and Spring Boot. Automated tests use JUnit and Spring Boot’s test utilities for integration testing of Spring components. The actual work performed by the build pipeline is based on Gradle build logic.
The main focus of this post is going to be on modeling pipeline capabilities of Jenkins. I’d encourage you to have a look at the Gradle build scripts available in the source code repository to learn more about the build logic. Before diving into Jenkins right away, let’s first have a look at the different stages of build pipeline you are about to model.
Modeling the build pipeline
A build pipeline, also called deployment pipeline, represents the delivery process of a software broken down into individual stages. A change to the code of that software travels through the stages of the pipeline with the goal of producing one or many deliverable artifacts that can be shipped to the customer. The book Continuous Delivery gives a great introduction to the topic of modeling build pipeline.
The build pipeline for the To Do web application should consist of the following phases:
-
Compile source code: Executes the Java compiler to turn production and test source code into byte code.
-
Execute unit tests: Runs the unit test suite for fast feedback.
-
Execute integration tests: Performs long-running integration tests.
-
Perform static code analysis: Analyzes the source code and identifies quality hotspots. For convenience reasons, the project uses the cloud-based service of Sonarqube.
-
Assemble the WAR file: Builds the final deliverable, a WAR file containing all resources needed in the runtime environment.
-
Deploy the deliverable to production: Pushes the WAR file to the Paas, Heroku, upon request.
Some of the phases should be executable in parallel especially the ones that might take a long time to finish e.g. integration testing (3) and static code analysis (4). While Continuous Deployment might work perfectly for this kind of application, the pipeline should also implement a manual step that only triggers deployment to production (6) if a user pushes a button.
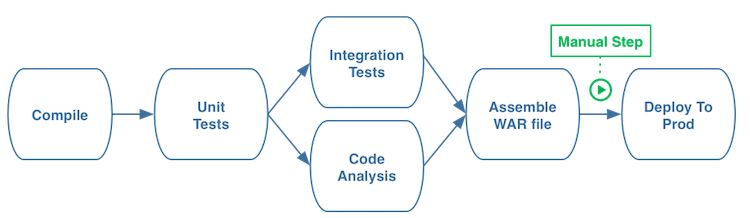
Figure 2. The build pipeline in theory
The next section talks about the necessary prerequisites for implementing the sample pipeline in Jenkins.
Setting up Jenkins
You can literally get up and running with Jenkins in a matter of minutes. Just follow the steps below if you want to set up Jenkins on your local machine and install all relevant plugins.
Installing Jenkins
First, you’ll need to install Jenkins on your developer machine or on a server. Download the desired distribution from the "Getting started with Jenkins" page. For the purpose of this blog post, you’ll download the WAR file which is runnable on all operating systems.
Navigate to the directory containing the WAR file and execute the command java -jar jenkins.war from your console. Bring up Jenkins in the web browser of your choice via the url http://localhost:8080/. Log in with the temporary administrator password and simply go with the option "Install suggested plugins". The pipeline plugin, responsible for defining and rendering build pipelines in Jenkins, is a standard plugin and will be installed automatically. In the next screen, set up a new admin user.
In addition to the visualization provided by the standard pipeline plugin, I prefer to use the view introduced by Blue Ocean plugin. Blue Ocean aims to offer a fresh and overhauled UI. Later, you’ll explore the standard pipeline view as well as the visualization provided by Blue Ocean.
Defining credentials
As part of our pipeline, you’ll use SonarCloud for static code analysis and Heroku for hosting the application. Both services have free tiers. Sign up for an account if you’d like to take advantage of these services. In this section, you’ll configure the credentials for SonarCloud and Heroku in Jenkins. As a result, the pipeline will have access to environment variables that can be passed down to the Gradle build.
SonarCloud and Heroku provide an access token that can be retrieved from the setting page of the corresponding service after logging in. In Jenkins you can declare those access tokens as "Secret text" under "Jenkins > Credentials". For the purpose of this sample pipeline, we’ll create the credentials with ID SONARCLOUD_TOKEN and HEROKU_API_KEY. Figure 3 shows the definition of the SonarCloud credentials.
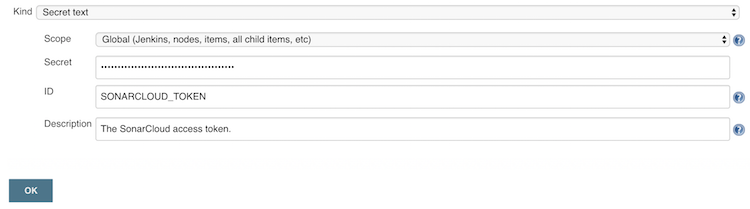
Figure 3. Adding SonarCloud credentials
Next, we’ll dive into the creation of the job that defines the build pipeline.
Pipeline definition in Jenkins
Creating a Jenkins pipeline is not fastly different from creating a freestyle project. Select the "Pipeline" option in the job creation screen to get started. We’ll use the job name todo-spring-boot for now to reflect the project name on GitHub.
For pipeline definitions we have two options:
-
Defining a pipeline script in the Jenkins job that can be edited on-the-fly.
-
Referring to a pipeline script from SCM.
In the light of Infrastructure as code, we’ll go with option 2. The Github repository already contains the file defining the desired layout and configuration of the pipeline for our job. By default, this file is called Jenkinsfile. Listing 1 shows pipeline definition in its full beauty.
Jenkinsfile
Listing 1. The pipeline definition as code
As you can see in the listing, the code is very readable and understandable even if you do not know the syntax in more detail. The script defines each stage of the pipeline in order. Each stage may contain one or many steps. The actual "work" of the pipeline happens under the covers and is performed by Gradle. Jenkins merely acts as orchistration engine.
Let’s see what happens when we execute the job by triggering the "Build Now" action. Jenkins runs through all stages of the pipeline up until the point that requires manual execution. In the console view, you can confirm or abort the manual execution to trigger the deployment to production. Below you can find the standard view of the pipeline in the job.

Figure 4. Jenkins stage view
You might have noticed that the standard job view of the pipeline does not render parallel stages or manual triggers. Blue Ocean makes a much better attempt at rendering those features. In the next section, we’ll have a brief look at what Blue Ocean pipeline views have to offer.
A look at the Blue Ocean pipeline view
In an earlier section, you installed the Blue Ocean plugin. On the left hand side, of your job screen you should see a "Open Blue Ocean" option. Executing the job shows a much richer representation of the pipeline. You can literally see how your change travels through each stage of the pipeline in real-time. The following screenshot shows the waiting state of the pipeline expecting user input on the promotion stage. The UI even provides an option to proceed with the next stage or abort the flow of the pipeline.
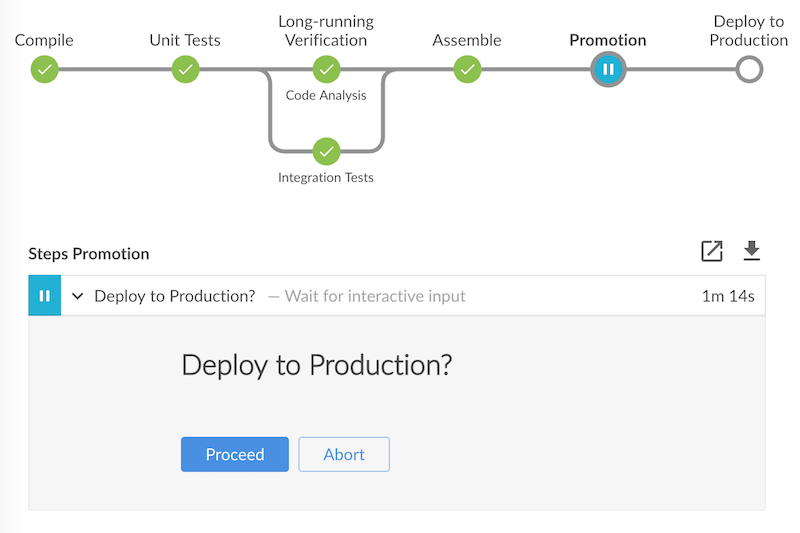
Figure 5. Blue Ocean view of the pipeline waiting for user input
In the pipeline script above, you configured to wait for interactive input during the promotion step for one day. Jenkins automatically times out the manual operation after the defined waiting period. If you don’t want to wait this long, then you can always abort the operation manually.
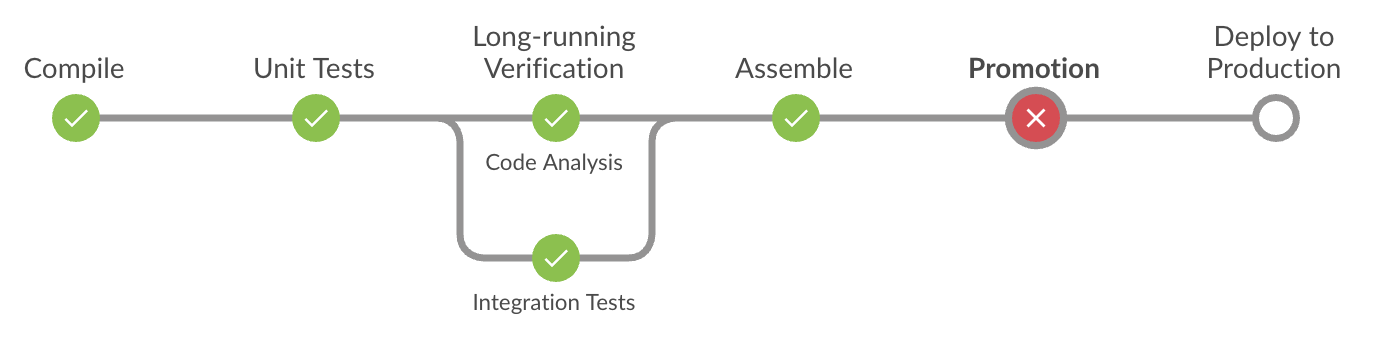
Figure 6. Aborting a manual step in Blue Ocean pipeline view
If you happen to actually want to deploy the WAR file to production, then all you need to do is to press the "Proceed" button. The pipeline will continue its operation immediately and move on with the next stage in line.
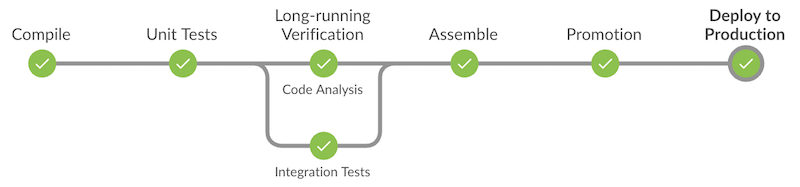
Figure 7. Triggering the deployment via manual step in Blue Ocean
Conclusion
Jenkins has made big strides in trying to unify, streamline and visualize build pipelines as integrated product. The DSL used to define pipelines is understandable and allows for declaring imperative logic for more customization.
I found that the official documentation of the DSL sometimes lacks clarity or is somewhat out-of-date. I also found code snippets all over the internet that do not work anymore with the latest version of the pipeline plugin.
Blue Ocean feels like a disjunct product from the rest of the Jenkins UI. In the long run, I suspect Blue Ocean to become the one and only look & feel for Jenkins.